Scheduling Instagram posts and Reels in advance helps you stay consistent, save time, and plan your content more effectively. There are three main ways to do it:
- Instagram’s native scheduler
- Meta Business Suite
- A third-party scheduling tool like SocialBu, which supports multi-account management, bulk scheduling, and cross-platform publishing.
Each option works differently and is suited to different workflows.
The best option depends on your workflow, whether you manage one account or several, and the features you need.
In this guide, you’ll learn how to schedule Instagram posts and Reels step by step, compare the 3 available scheduling methods, understand Meta’s limitations for scheduling content, troubleshoot common issues, and choose the best option for your needs in 2026.
Key Takeaways
- You can schedule Instagram posts and Reels in three ways: the Instagram app, Meta Business Suite, or a third-party scheduling tool like SocialBu.
- As of March 2026, eligible public Instagram accounts can schedule posts natively without switching to a Business or Creator account.
- Instagram’s native scheduler lets you schedule up to 25 posts per day and 75 days in advance.
- Meta Business Suite is the best free option for scheduling Instagram posts from a desktop and supports Instagram Stories, too.
- SocialBu removes native scheduling limits. It supports multiple Instagram accounts, bulk scheduling, team collaboration, AI-powered captions, analytics, and cross-platform publishing.
- According to SocialBu data, more than 283,376 Instagram posts have been published through SocialBu since launch, with Instagram publishing growing 3× in six months.
How to Schedule Instagram Posts and Reels Natively From the Instagram App
You can schedule an Instagram post straight from your phone. The built-in Instagram native scheduler is free to use.
With it, you can schedule Instagram Reels, posts, and carousels in advance. It’s a simple option if you manage a single account and don’t need advanced scheduling features.
However, private accounts still can’t schedule Instagram posts or Reels this way. Switch to the public account from your Instagram settings, and you’ll find the scheduling option in Advanced settings.
Here’s exactly how to schedule Instagram posts from your mobile via the Instagram app.
Step 1: Create a New Instagram Post
Open the Instagram app and tap the + button.
Choose the type of content you want to publish, such as a photo, carousel, or Reel, and then upload your media.
Step 2: Add Your Caption, Hashtags, and Tags
Write your caption, add your hashtags, and tag people if needed.
Add a location and apply any filter if you want to.
Step 3: Open Advanced Settings
Once your post is ready, tap ‘More options’ or ‘Advanced settings’ (depending on your app version and phone). On iPhone, it’s under Advanced settings. On Android, it’s under More options.
Scroll until you find the ‘Schedule this post’ option.
Step 4: Toggle On “Schedule This Post”
Toggle the ‘Schedule this post’ switch on. A date and time picker will pop up. Choose when you want it to go live.
For the best results, schedule your content when your audience is most active. If you’re unsure, review your Instagram Insights to identify your peak engagement times.
Two limits to know before you set the date:
- You can schedule up to 75 days in advance
- You can queue up to 25 posts per day per account
Most creators and small teams never come close to either limit, but it’s worth knowing they’re there before you plan out batch content scheduling.
Step 5: Confirm and Schedule Your Post
After selecting your preferred schedule, tap ‘Done.’
Tap back to return to the main post screen, then tap ‘Schedule.’
And it’s done.
Your post will now appear in your scheduled content until it’s automatically published at the selected time.
Where to Find Your Scheduled Posts
Head to your Profile → Menu → Scheduled content. Everything scheduled to publish lives there, and you can review or delete it before it goes live.
What Type of Content You Can’t Schedule This Way
Native Instagram scheduling covers regular posts, carousels, and Reels, but a few post types are locked out of it entirely:
- Instagram stories
- Collab posts
- Sponsored or branded content
- Product-tagged shopping posts
- Fundraisers
If you’re posting any of these, you’ll need to publish manually or use a third-party social media scheduling tool to schedule them.
How to Schedule Instagram Posts and Reels From Desktop (Via Meta Business Suite)
You can schedule Instagram posts from desktop too, using Meta Business Suite.
Meta Business Suite is Meta’s free publishing tool. It lets you create, schedule, and manage content for both Instagram and Facebook from your desktop.
There’s one prerequisite you need to sort out first: ensure your Instagram account is connected to a Facebook Page through the Accounts Center. Meta Business Suite runs on that connection, so if you haven’t linked the two yet, do that first from your Instagram settings before you try to schedule anything.
Plus, one thing Business Suite supports that native mobile scheduling doesn’t: Stories. You can’t schedule Instagram Stories directly in the app, but Business Suite lets you queue them up in advance.
Follow these steps to schedule Instagram posts or Reels through Meta Business Suite on your desktop browser.
Step 1: Open Meta Business Suite
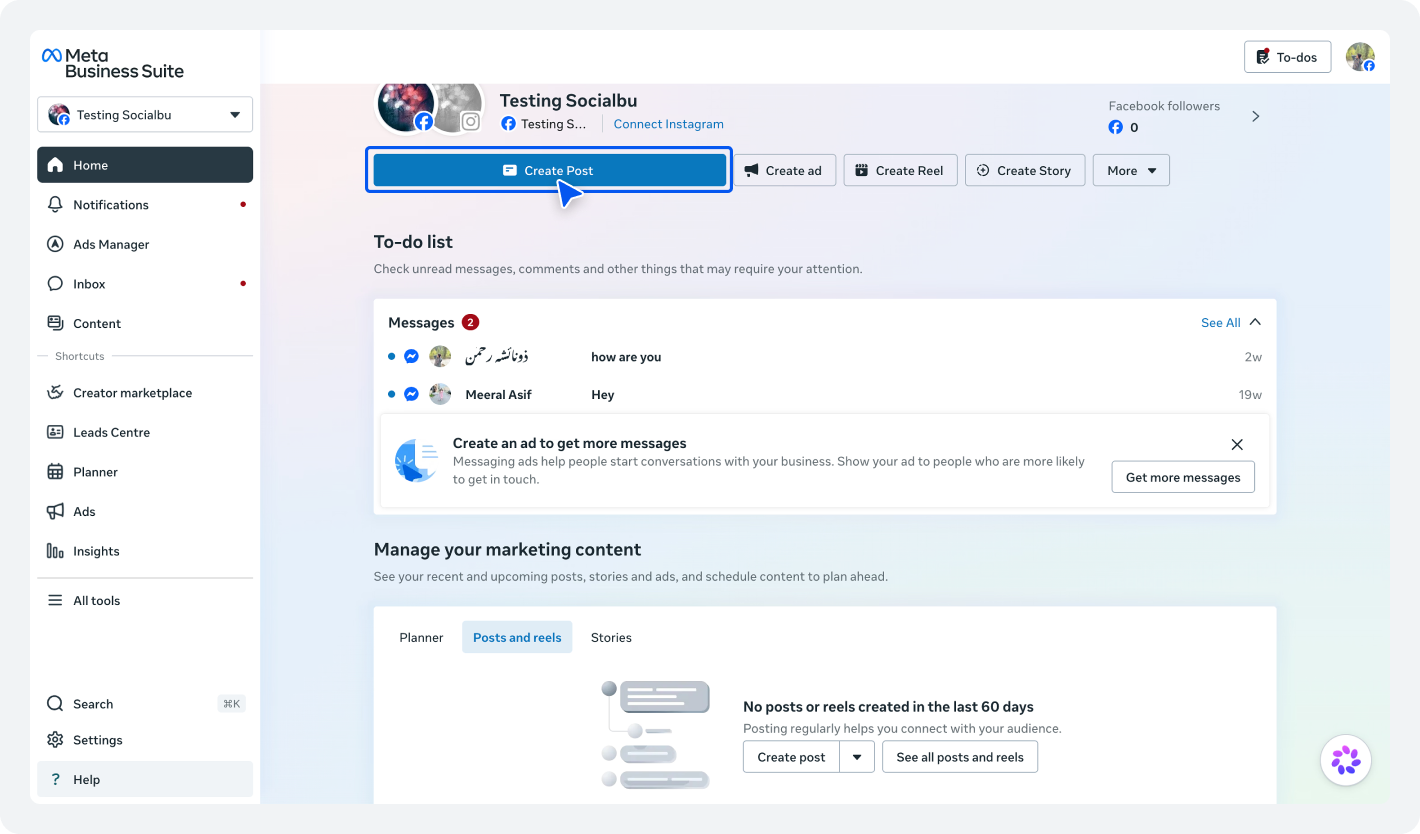
Go to your Facebook Page. Open your Meta Business Suite account.
From the left-hand menu, click ‘Create Post.‘ You can do this from the Planner or Content tab.
Step 2: Choose Instagram as Your Publishing Platform
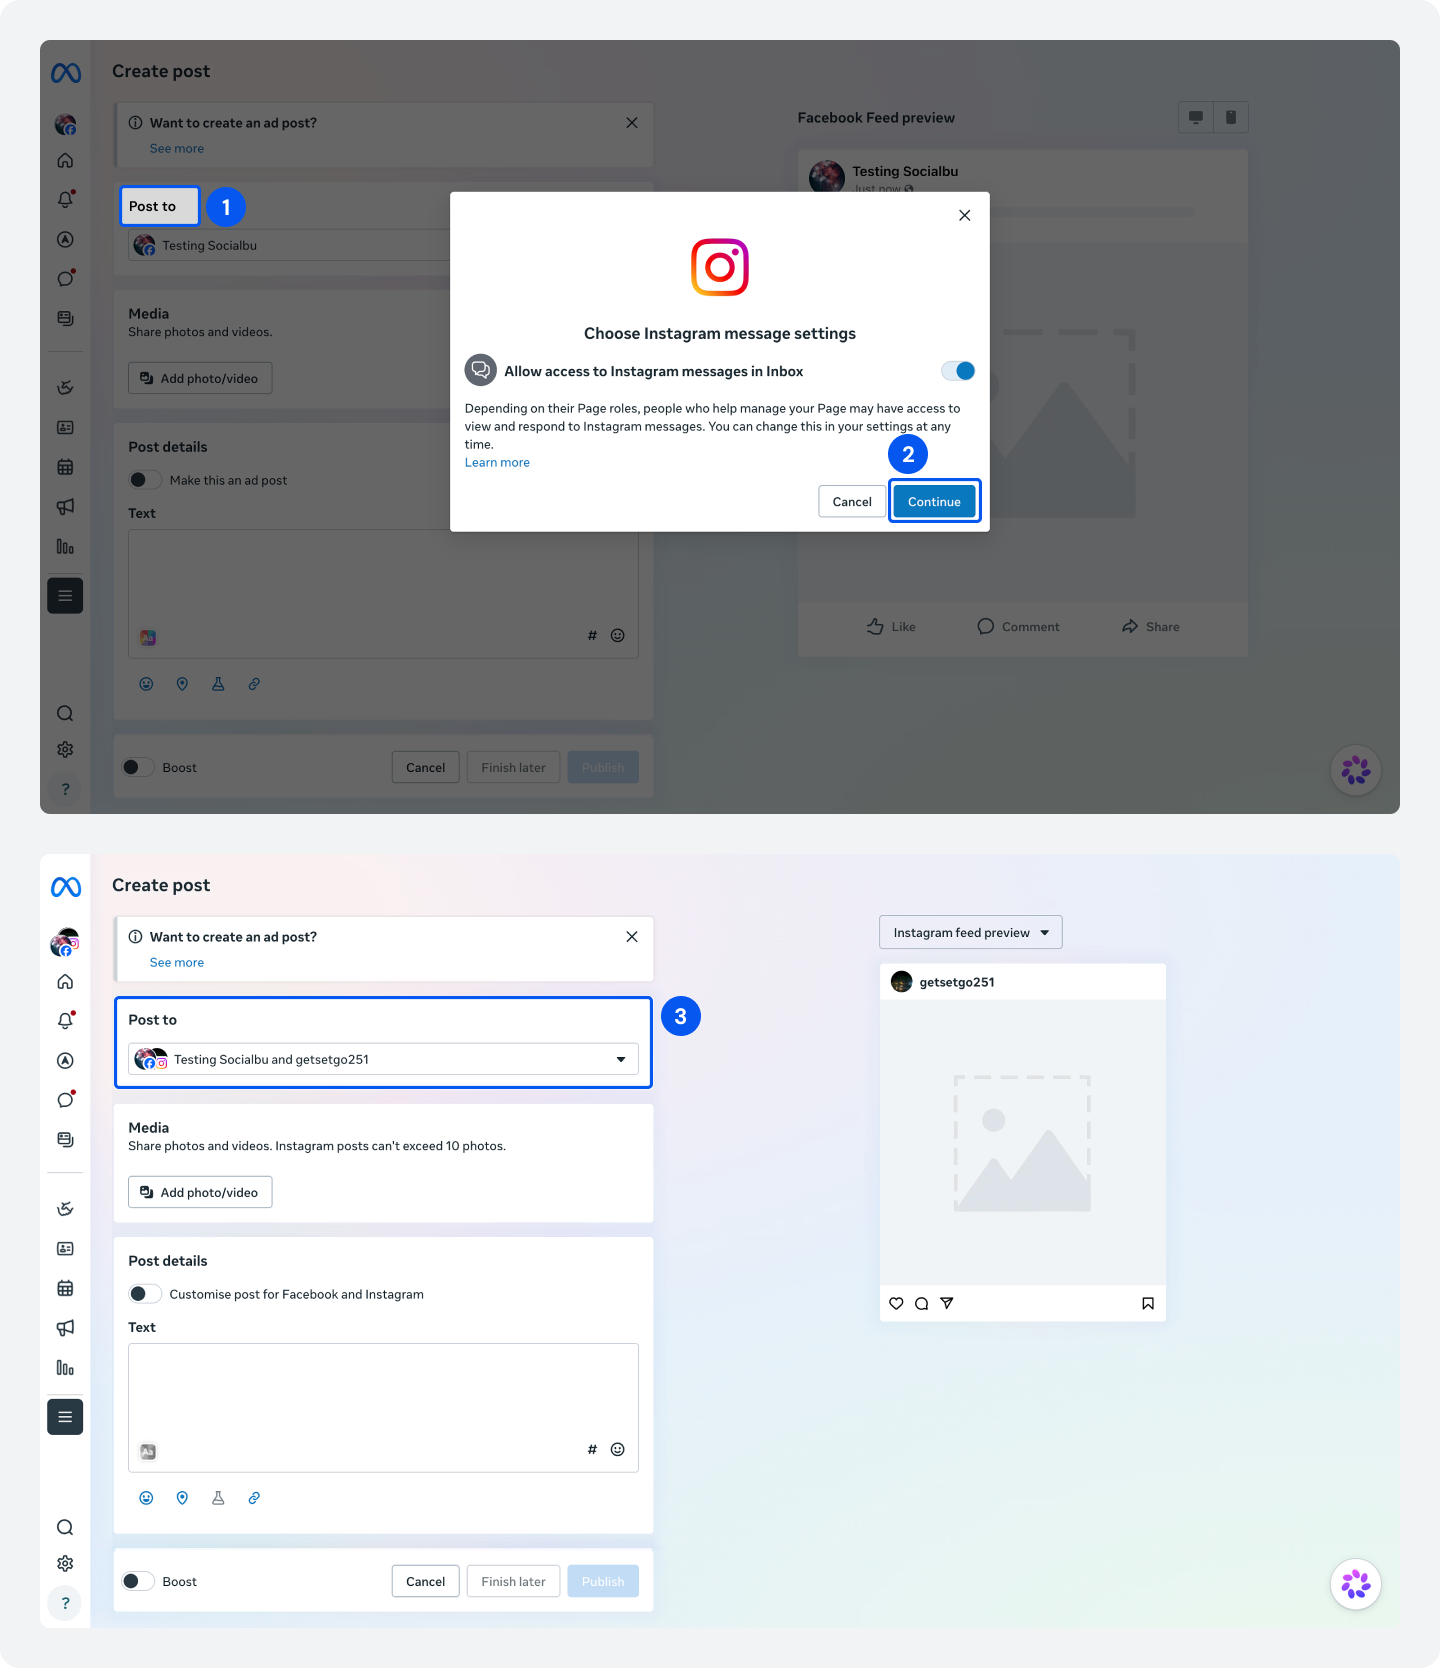
Under the ‘Post to’ tab, select Instagram as the platform where you’d like your content to be published. If you manage both Facebook and Instagram, you can choose both platforms to cross-post your social media post.
Step 3: Upload Your Content
Upload your media, carousel, or video, then write your caption.
You can also add hashtags, tag people where supported, and review how your post will appear before publishing.
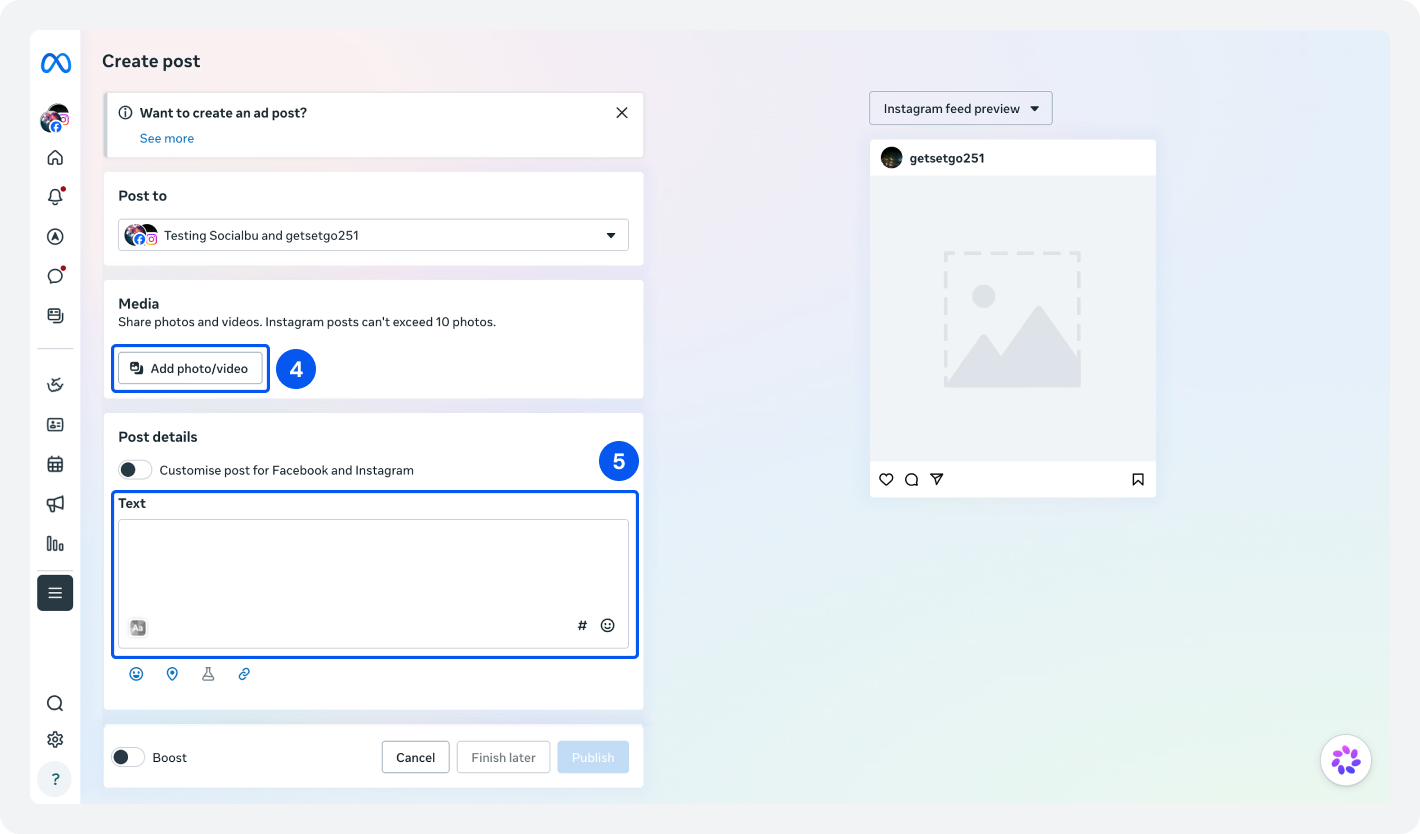
Step 4: Schedule Your Post
Scroll down to the scheduling options and turn on the ‘Set date and time’ option.
Choose your preferred publishing date and time for your Instagram post to go live.
Step 5: Preview Your Post
Before scheduling, use the preview panel to check your content.
Look for formatting issues, caption spacing, cropped images, or any mistakes that are easier to catch on a desktop screen.
Now, hit the ‘Schedule’ button.
Your post is now queued, and you can see it under Content → Posts and Reels in the left sidebar whenever you want to check on it.
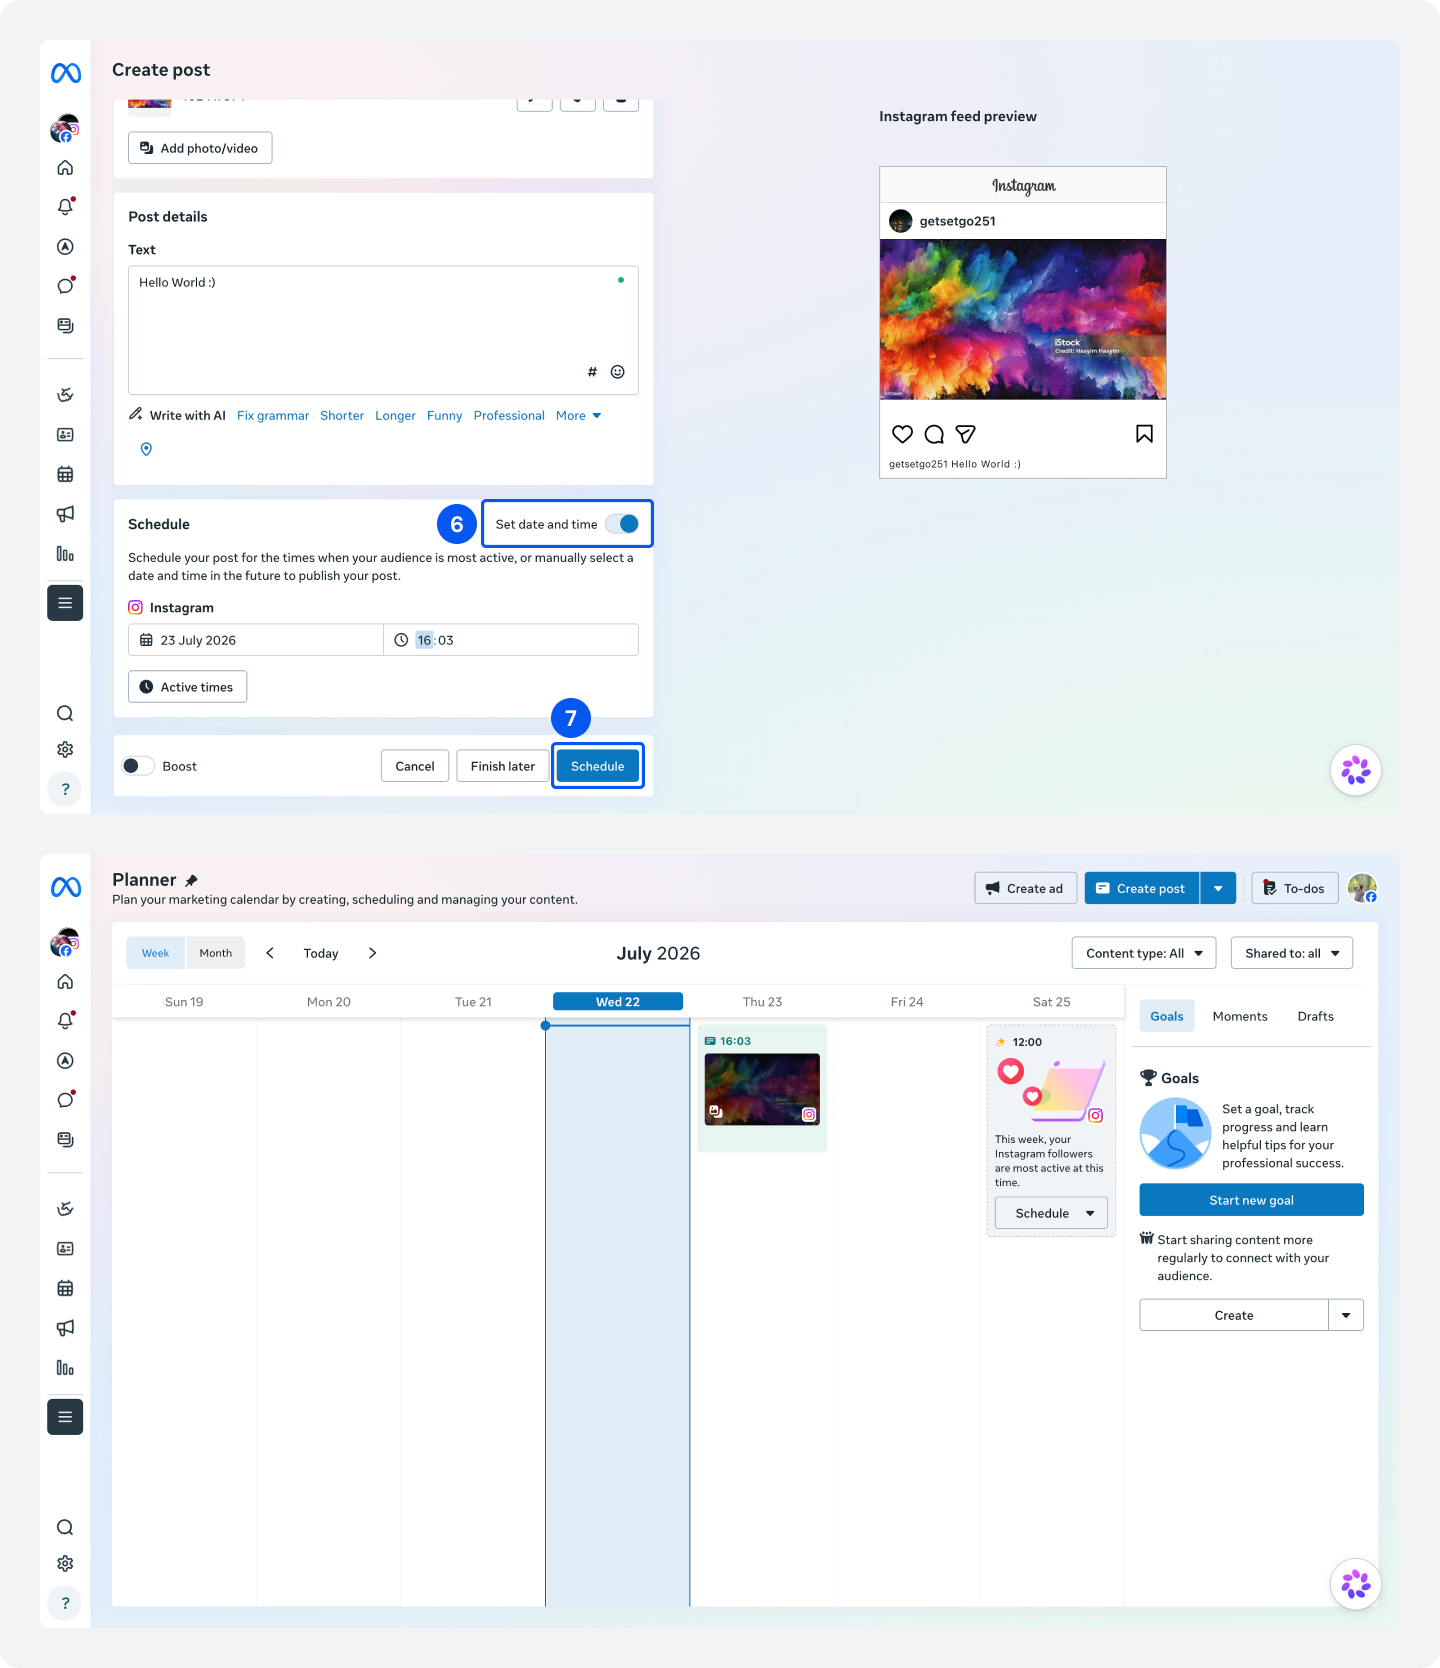
From there, you can review your upcoming content, make changes if supported, or adjust your publishing schedule before the post goes live.
Where Meta Business Suite Falls Short
Business Suite is a good starting point, but it’s not a full social media scheduling tool, and it shows in a few places:
- No batch upload and approval workflow. There’s no CSV or spreadsheet import option to bulk-schedule content for Instagram. Every post gets scheduled one at a time. Also, there’s limited collaboration and approval workflow for teams.
- No cross-platform calendar. Meta Business Suite only allows you to connect to one Instagram account and one Facebook account. If you’re also posting to TikTok, LinkedIn, Pinterest, or X, you’re still managing those from separate places.
- Stories lose their interactive stickers. Polls, questions, and other interactive elements don’t carry over when you schedule an Instagram Story through Meta Business Suite.

How to Schedule Instagram Posts and Reels With SocialBu
Native scheduling and Meta Business Suite both do the basics well, but they’re built for a single account and platform.
If you’re managing multiple Instagram accounts or you just want fewer limits and more control, try scheduling your Instagram posts and Reels with SocialBu.
SocialBu is an all-in-one social media management tool that lets you plan, auto-post to Instagram, organize everything in a visual drag-and-drop content calendar, collaborate with your team, and manage multiple accounts from one place, all without switching between different tools.
Let’s look at how you can schedule Instagram posts and Reels with SocialBu.
Step 1: Sign up for SocialBu
Go to SocialBu.com and sign up for free. It only takes a couple of minutes, and you don’t need a credit card to get started.
You can sign up for a free account or a 7-day free trial on all the paid plans.
Step 2: Connect Your Instagram Account(s)
Now, connect the Instagram profile(s) you want to manage. You can connect multiple Instagram Business or Creator accounts to SocialBu, as it lets you manage and schedule content to multiple social accounts from one dashboard.
From your SocialBu dashboard, go to Control Center → Social Accounts and connect your Instagram account by clicking ‘+ Add Account.‘ SocialBu will ask for permission to access it, so confirm that, add details, and you’ll be linked.
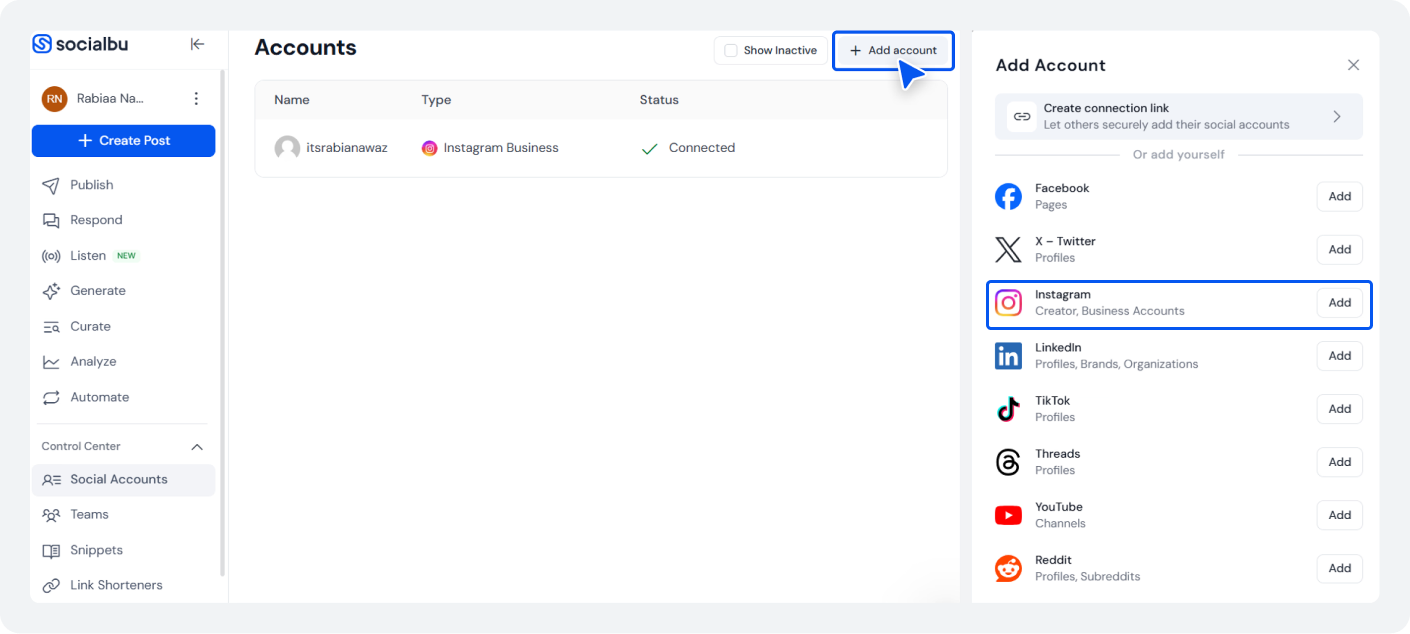
If you’re managing content for clients or different brands, this keeps everything organized in one place.
Step 3: Upload Your Photos or Reels
Click ‘Create Post’ from the top left side or click ‘Schedule Post’ from SocialBu’s main dashboard and upload your images, carousel, or Reel. Select your connected Instagram account and upload your Reel or post.
SocialBu supports various content formats, allowing you to prepare your posts in one place before publishing.
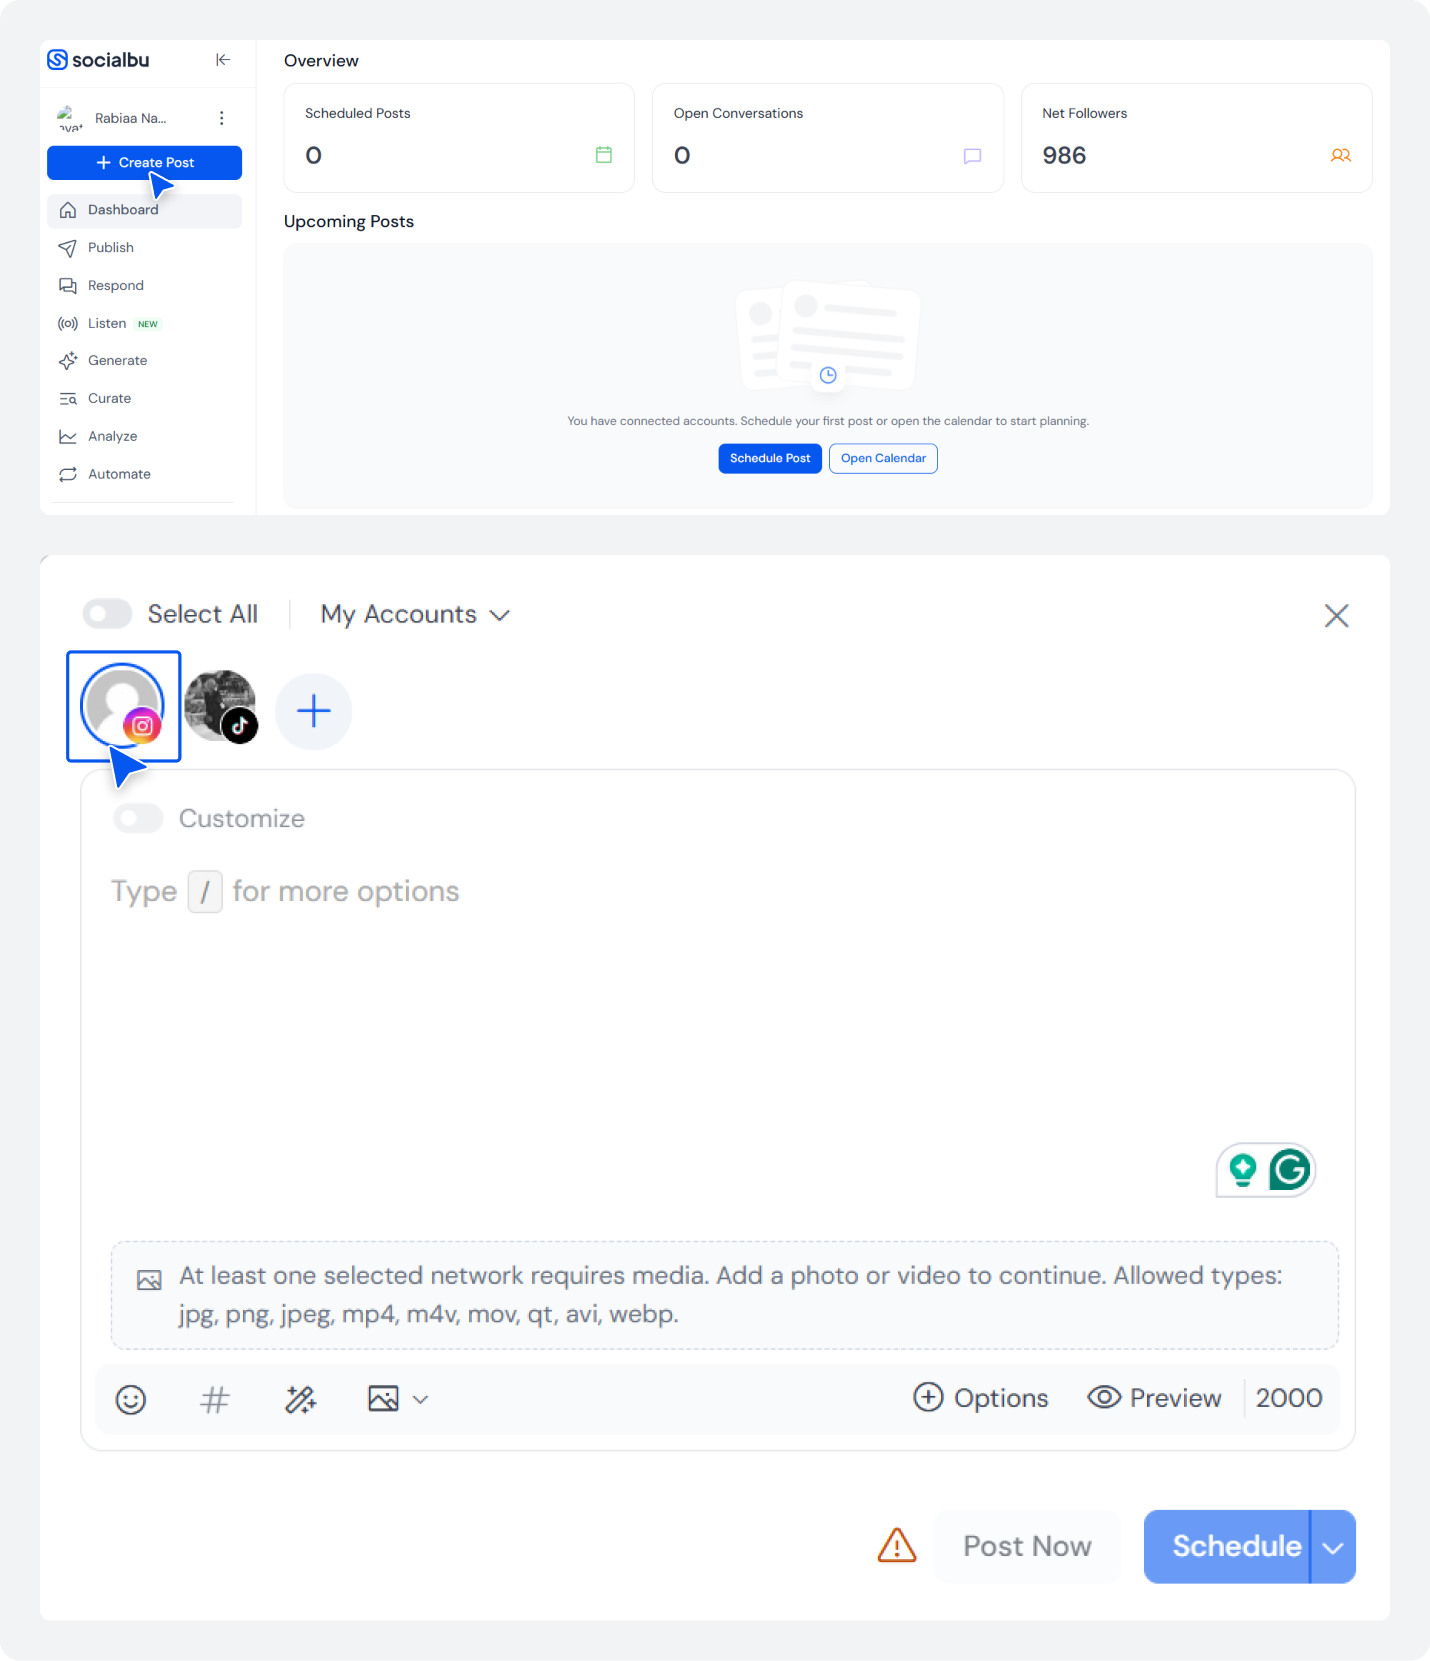
Step 4: Add Your Caption, Hashtags, and Other Details
Write your caption, and if you need some inspiration, you can use SocialBu’s built-in AI assistant to write your captions.
Add your hashtags and emojis as you normally would.
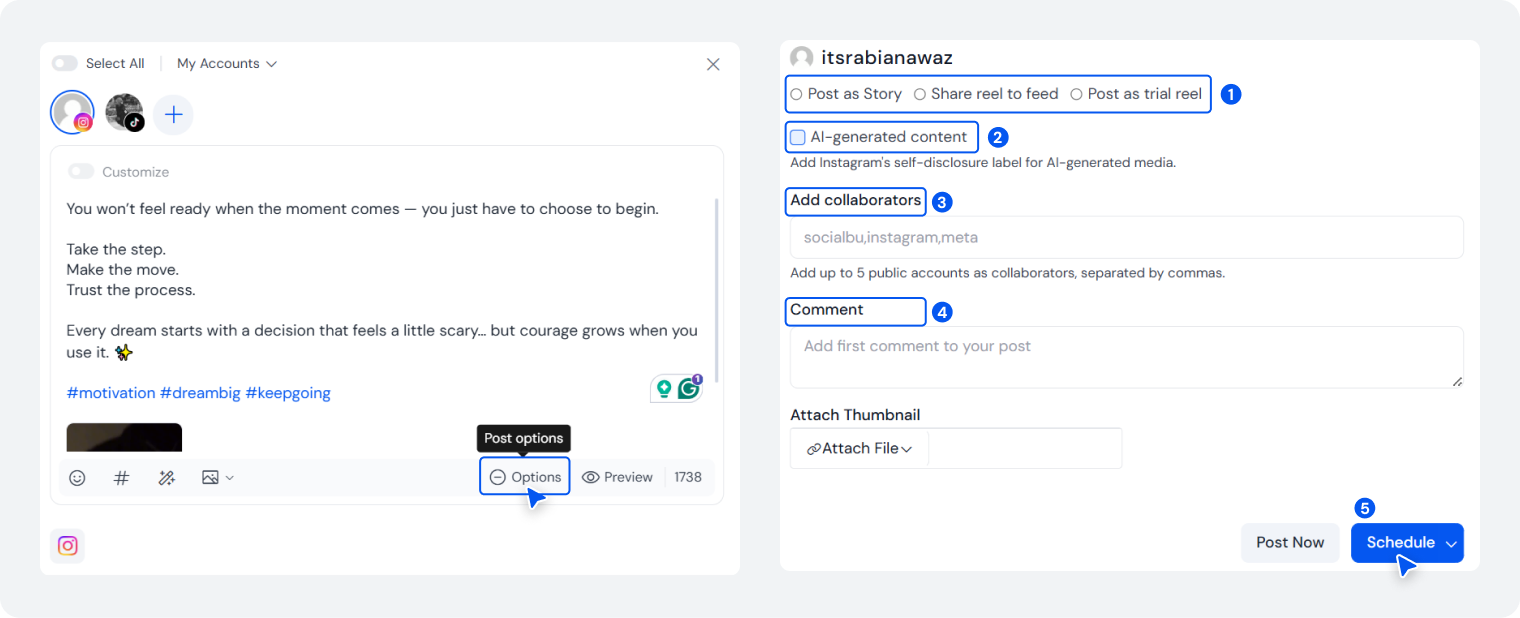
Now, click on ‘Options’ to get more post options.
Here, you can also select from:
- Post as Story
- Share Reel to Feed
- Post as trial Reel
Tick the AI-generated content box if the content is produced via AI.
Add collaborators. You can also schedule your first comment for the post using the comment box.
Now, select ‘Schedule.’
Step 5: Choose Your Publishing Date and Time
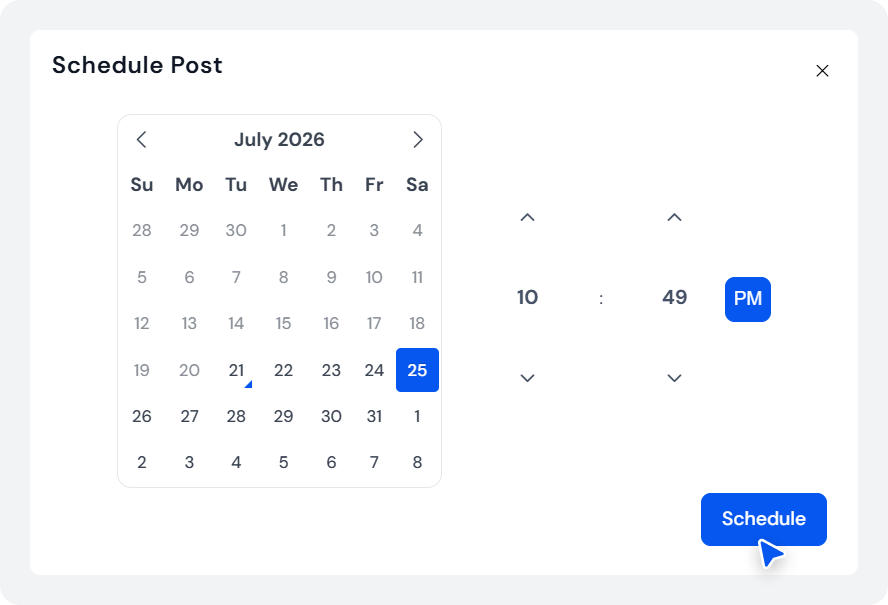
Now, choose the date and time when you want your content to go live.
And finally, hit the ‘Schedule’ option.
Your Instagram post or Reel has been scheduled successfully, and you can see it in the main dashboard or in your calendar.
Now, you can see your upcoming posts, identify publishing gaps, and maintain a consistent posting schedule in your SocialBu visual content calendar.
You can also edit, preview, and reschedule your posts/Reels.
Step 6: Publish Across Multiple Social Platforms
If you’re sharing similar content on different networks, you don’t have to recreate the post each time.
With SocialBu, you can manage and schedule content to 12 social media platforms, including Facebook, TikTok, LinkedIn, Pinterest, X (Twitter), Google Business Profile, Threads, YouTube, and more, from the same dashboard.
Just select the platform (as you do for Instagram) where you want to cross-post.
You can customize each post for the platform while managing your publishing schedule in one place.
Step 7: Monitor Performance with Analytics
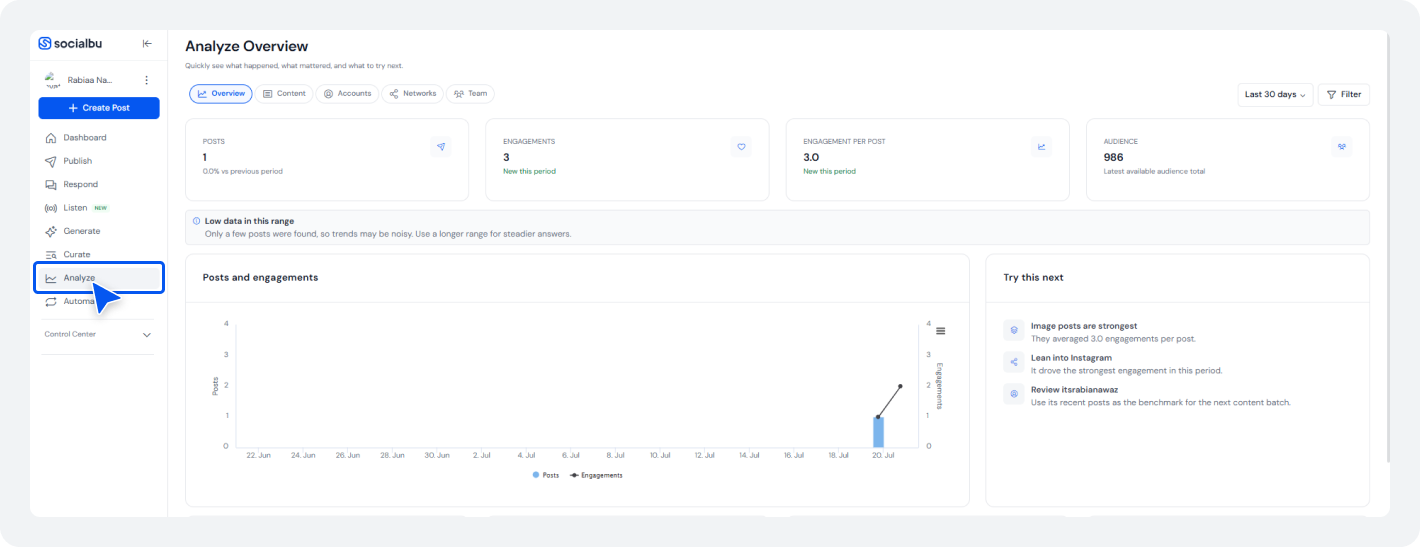
Publishing is only part of the process. After your content goes live, use SocialBu’s analytics to monitor engagement, identify top-performing posts, and understand what resonates with your audience.
These insights help you refine your content strategy and make smarter scheduling decisions over time.
Why Use SocialBu Instead of Instagram’s Native Scheduler?
While Instagram’s built-in scheduler works well for basic publishing, SocialBu is built for marketers, social media managers, and agencies who need more flexibility and control.
According to SocialBu data, Instagram publishing with SocialBu grew 3x in just 6 months, from 8K posts per month (January 2026) to 26K+ posts per month by May-June 2026. This is huge.
With SocialBu, you can:
- Schedule Instagram posts, Stories, Carousels, and Reels from a single dashboard.
- Manage multiple Instagram accounts without switching between logins.
- Plan content visually with a shared content calendar.
- Bulk schedule posts to save time on recurring publishing.
- Generate and improve captions with AI assistance.
- Publish across multiple social media platforms.
- Track content performance with built-in analytics.
- Collaborate with teammates using shared workspaces and publishing workflows.
And, most importantly, you do not have to face the 75-day scheduling limit and cap yourself at 25 posts a day. With SocialBu, you can schedule your posts or Reels in days, weeks, or months in advance with no time limit.
Say Goodbye to Manual Instagram Posting With SocialBu
Plan, schedule, and auto-post to Instagram and other social media platforms from one dashboard, and keep your content calendar organized.
Native Scheduling vs. Meta Business Suite vs. SocialBu: Which Method to Schedule Instagram Posts Should You Choose?
Till now, you know all three ways to schedule Instagram posts. But which one should you actually use? Well, the right choice depends on how you create content, how many accounts you manage, and whether you need advanced planning or collaboration features.
Here’s the side-by-side breakdown of all three ways to schedule your Instagram Reels or posts.
Features | Instagram App (Native) | Meta Business Suite | SocialBu |
Account requirements | Any public account | Instagram linked to a Facebook Page | Instagram linked to a Facebook Page |
Daily limit | 25 posts/day | 25 posts/day | No daily cap |
Advance limit | 75 days | 75 days | No advance limit |
Stories support | No | Yes | Yes |
Batch upload | No | No | Yes |
Multi-account scheduling | No | No | Yes |
Approval workflows | No | No | Yes |
Analytics | Basic, in-app only | Basic, Meta properties only | Full analytics dashboard |
Cost | Free | Free | Free plan available, 7-day free trial on all paid plans |
So, Which Instagram Scheduling Method Should You Choose?
- Use the Instagram app if you manage a single account, publish occasionally, and simply want a free way to schedule posts and Reels.
- Use Meta Business Suite if you primarily manage Facebook and Instagram and prefer scheduling from a desktop.
- Choose SocialBu if you manage multiple Instagram accounts, collaborate with a team, need approval workflows, or want to publish across multiple social media platforms from a single dashboard.
Why Can’t I Schedule Posts on Instagram? Troubleshooting Tips and Solutions
Account settings, platform limitations, or publishing errors cause Most Instagram scheduling issues. However, they’re easy to fix.
Here are the most common problems and how to solve them.
Why Is the “Schedule This Post” Option Missing?
If you don’t see the Schedule this post option while creating a post or Reel, check the following:
- Your Instagram account is set to Private. Native scheduling is available only for eligible public accounts. Go to Settings → Account privacy and switch to public, then try again.
- You’re using an outdated version of the Instagram app. Update it to the latest version.
- The feature hasn’t rolled out to your account or region yet.
- Temporary app glitches can also hide scheduling options. Restart the app or log out and back in.
Why Didn’t My Scheduled Post Publish?
A scheduled post may fail to publish for several reasons.
Common causes include:
- Your Instagram account was disconnected from the scheduling platform.
- You’ve reached Instagram’s native limit of 25 scheduled posts per day.
- The uploaded images or videos don’t meet Instagram’s supported file specifications.
- Instagram temporarily restricted publishing due to unusual or flagged account activity.
- Your internet connection was interrupted while scheduling the post.
If the post doesn’t publish, reconnect your account (if you’re using a third-party tool), review the media format, and try scheduling it again.
Why Can’t I Schedule a Collab or Sponsored Post?
Because native scheduling doesn’t support them, you have to manually publish collab posts, sponsored or branded content, and product-tagged posts from the app. If that’s a regular part of your workflow and manually publishing is getting tough, use an Instagram scheduling tool like SocialBu to handle post types native scheduling can’t.
What Should You Do If You Keep Running Into Scheduling Issues?
If you regularly manage multiple Instagram accounts, switch between devices, or publish content across several social networks, native scheduling can quickly become limiting.
A dedicated scheduling platform like SocialBu helps reduce common publishing issues. It lets you manage connected accounts from one dashboard, organize content with a visual calendar, monitor scheduled posts, and collaborate with your team.
What Are the Limitations of Native Instagram Scheduling?
Instagram’s built-in scheduler is a convenient way to post to Instagram for free. However, it has a few limitations that are worth knowing before you rely on it for your content strategy.
- You can schedule posts up to 75 days in advance. If you plan campaigns further in advance, you’ll need to schedule them later or use an Instagram scheduling tool with more flexible planning options.
- You’re limited to 25 scheduled posts per day per Instagram account. If you publish frequently, this cap becomes restrictive.
- Instagram story scheduling is limited. Only Meta Business Suite and third-party social media scheduling tools support scheduling Instagram Stories.
- Collaborative and sponsored posts aren’t supported. You have to manually publish collab posts, branded content, product-tagged posts, and fundraisers or use a tool.
If you only publish occasionally from a single account, Instagram’s native scheduler is often enough.
However, if you need to manage multiple accounts, schedule content in bulk, or publish across different social media platforms, a dedicated Instagram scheduling tool like SocialBu offers automation, bulk scheduling, AI support, and more.
Join Thousands of Creators Scheduling Smarter with SocialBu
777 unique users scheduled/published Instagram content via SocialBu in the last 30 days. You can also schedule posts and Reels and manage multiple accounts.
What Are the Best Practices for Scheduling Instagram Posts and Reels in 2026?
Scheduling your content in advance saves time, but it shouldn’t make your Instagram strategy feel automated. Use scheduling to stay consistent with your online presence while leaving some space for real-time engagement and trending content.
Here are a few best practices to help you get the most out of your scheduling strategy.
Schedule Consistently, Not Constantly
Consistency is more important than posting every day. Create a realistic publishing schedule you can maintain over time, rather than posting in a hurry and then going silent.
Build a social media content calendar to plan your posts and maintain a consistent publishing rhythm.
Schedule Around When Your Audience Is Most Active
Even the best content can underperform if it’s published when your audience isn’t online. Use Instagram Insights or your scheduling tool’s analytics to identify when your followers are most active, then schedule accordingly.
If you’re unsure where to start, check out our guide to the best times to post on social media for platform-specific recommendations.
Batch Your Content in Advance
Creating multiple posts in one sitting is far more efficient than starting from scratch every day. Set aside dedicated time each week to write captions, prepare visuals, and schedule your content in advance.
Batch creating content helps you maintain a consistent posting schedule, reduces last-minute stress, and gives you more time to focus on engaging with your audience.
Leave Room for Trends and Real-Time Content
Don’t fill your content calendar weeks in advance without any flexibility. Industry news, viral trends, and timely events can create valuable engagement opportunities.
A good rule of thumb is to leave a few publishing slots open each week so you can react quickly without disrupting your overall content plan.
Review Performance and Adjust Your Schedule
Scheduling isn’t a “set it and forget it” strategy. Regularly review your social media analytics to see which posts perform best, what times generate the most engagement, and which content formats resonate with your audience.
Use those insights to refine your publishing schedule. Do not rely on assumptions.
Repurpose Your Best-Performing Content
Not every post needs to be brand new. If a Reel, carousel, or educational post performed well, update it with fresh insights or a new format and share it again later.
Repurpose your high-performing content so you get more value from your best ideas while maintaining a consistent publishing schedule.
Wrap Up
Now that you’ve seen all three methods to schedule Instagram posts and Reels. Scheduling content is one of the easiest ways to stay consistent, save time, and maintain an active presence without manual effort.
You have 3 options to schedule Instagram posts: Instagram’s native scheduler, Meta Business Suite, or a dedicated scheduling tool. Which method you choose depends on your workflow, the number of accounts you manage, and the features you need.
Next steps:
- Choose the scheduling method that best fits your workflow.
- Plan and batch your content for the coming weeks.
- Review your analytics regularly to refine your posting schedule.
- Scale your workflow with SocialBu if you manage multiple accounts, collaborate with a team, or want to schedule posts across several social platforms from a single dashboard.
Start scheduling smarter today so you can spend less time publishing and more time creating engaging content.
Frequently Asked Questions
Q: How do I schedule a post on Instagram in 2026?
A: Open Instagram, create your post, and before hitting Share, tap Advanced settings (iPhone) or More options (Android). Toggle on “Schedule this post,” pick your date and time, then confirm.
Q: How far in advance can you schedule Instagram posts?
A: You can schedule up to 75 days in advance, whether you’re using native scheduling or Meta Business Suite. Third-party tools like SocialBu don’t have this cap; here you can schedule posts weeks or months in advance.
Q: What’s the daily limit for scheduling Instagram posts?
A: The daily limit for scheduling Instagram posts is 25 posts per day for both native scheduling and Meta Business Suite. SocialBu doesn’t impose a daily limit; you can schedule as many posts as you want across multiple accounts.
Q: Do I still need a Business or Creator account to schedule Instagram posts?
A: No. As of March 2026, any public Instagram account can schedule natively; no account switch required. Private accounts still can’t schedule Instagram posts.
Q: Can you schedule Instagram Stories in advance?
A: Not natively via the Instagram app. You’ll need Meta Business Suite or a third-party scheduling tool like SocialBu to schedule Instagram Stories.
Q: What’s the difference between Instagram’s native scheduler and Meta Business Suite?
A: Native scheduling works from your phone and covers posts, carousels, and Reels. Meta Business Suite runs on desktop, requires your Instagram account linked to a Facebook Page, and adds Stories support. Both share the same 25-per-day, 75-day scheduling limits.
Q: Why would you use a tool like SocialBu instead of Meta Business Suite?
A: SocialBu removes the daily post cap, supports multiple accounts and 12 social media platforms, adds approval workflows for teams, and gives you AI assistance and analytics in one dashboard, none of which Meta Business Suite offers.
Q: Can personal Instagram accounts schedule posts now?
A: Yes, as long as the account is public. Private personal accounts still can’t use native scheduling; switch to a Professional account if you want to schedule via the Instagram app or third-party tools.
Q: What’s the best time to schedule Instagram posts for maximum reach?
A: It varies by account. Check Instagram Insights to see when your specific audience is most active, rather than relying on a generic “best time,” or use SocialBu’s best time to post calculator to find the strongest posting times for your specific platform.