Staying consistent on LinkedIn is no longer optional; it’s essential. But posting regularly can be overwhelming. The good news? You don’t need to be online every day to maintain your presence. Thanks to LinkedIn post schedulers, you can plan content in advance and stay visible without the daily grind.
In this post, we’ll compare LinkedIn’s native scheduler with SocialBu’s LinkedIn post scheduler, walk you through step-by-step how-tos, and share pro tips to help you automate smarter, not harder.
Step-by-Step Guide to Scheduling a LinkedIn Post
Scheduling LinkedIn posts isn’t complicated once you know where to start. You can use either LinkedIn’s built-in post scheduler or third-party tools like SocialBu for more advanced features.
Let’s learn how to schedule LinkedIn posts for free in 2025.
Schedule LinkedIn Posts with LinkedIn’s Scheduling Feature
LinkedIn now allows users to schedule posts in advance—for up to 3 months—directly from the platform. It works for both personal profiles and company pages, and it’s completely free.
Here is a quick guide on how to schedule posts on LinkedIn for you.
1. Create Your Post
You can start by clicking the “Start a post” section on your LinkedIn homepage or company page. Then, you can craft your post by adding text, images, and relevant hashtags.

2. Find the Schedule Icon
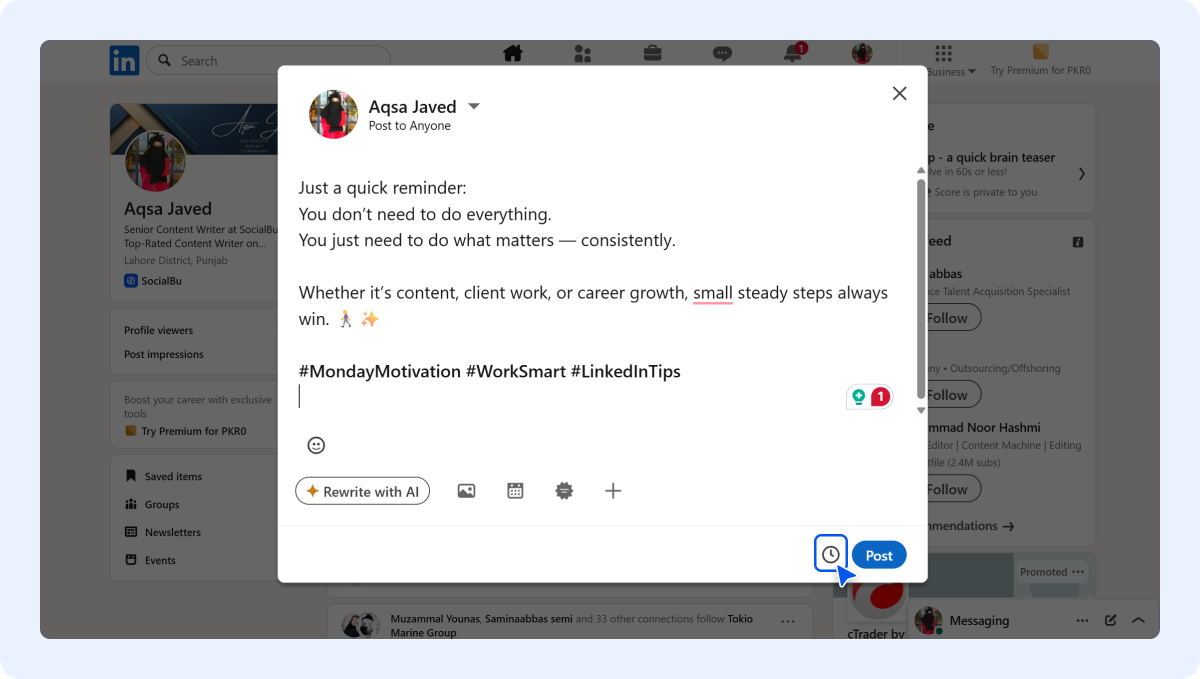
Once your post is ready, you can hit “Post” to publish it right away. However, if you want to schedule it for later, hit the small “clock” icon located next to Post.
3. Set Your Date and Time
Clicking the clock icon opens a calendar where you can select the date and time you want your post to be published. Schedule LinkedIn posts in advance by selecting a date and time that aligns with your target audience’s activity. LinkedIn allows scheduling within a 3-month window.
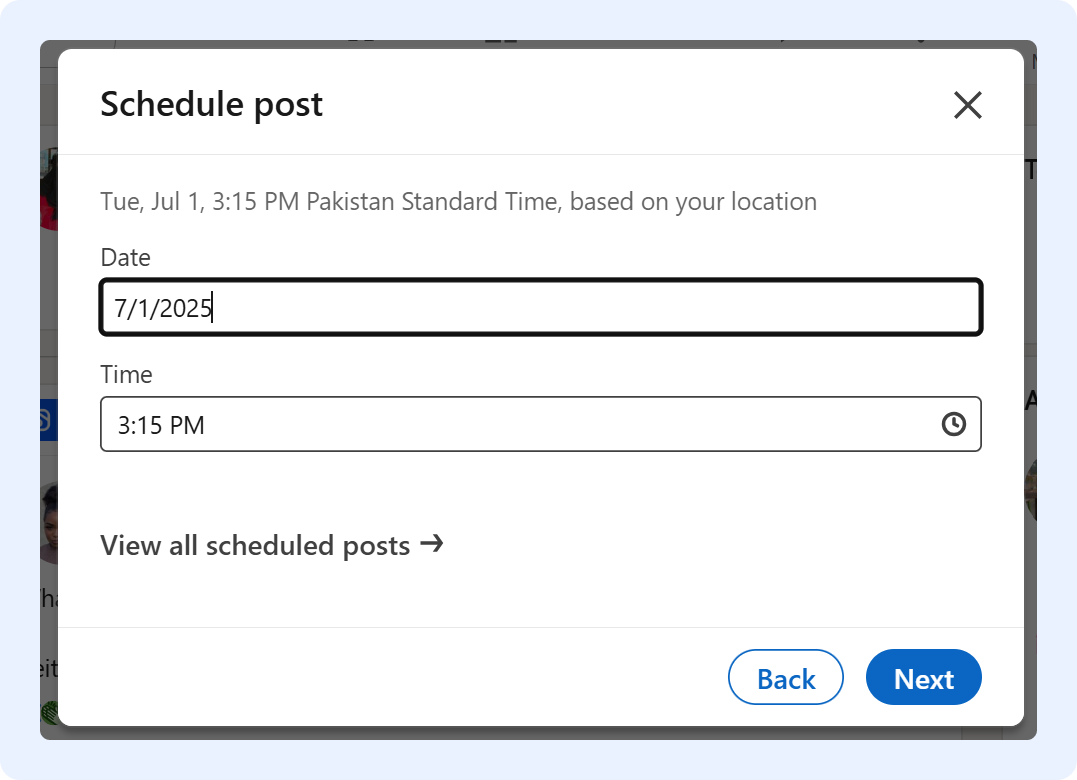
4. Review and Schedule
Once you’ve chosen the desired date and time, you can preview your post before scheduling by clicking ‘Next’ to ensure everything looks perfect and make any final edits. When everything looks good, click the “Schedule” button to make your post go live at the chosen time.
Limitations of LinkedIn’s Native Post Scheduler
Now that you know how to schedule a LinkedIn post using the native post scheduler, let us walk you through some limitations that it comes with.
- No support for carousels, polls, jobs, or event posts
- No bulk LinkedIn scheduling
- No in-depth LinkedIn analytics
- No cross-platform automation
- No rescheduling or editing after scheduling
- Only a 3-month prior scheduling window
If you want to post smarter and faster, a third-party LinkedIn post scheduler is a better fit.
Why Scheduling LinkedIn Posts Saves Time?
Building a strong presence on LinkedIn requires consistent posting, but who has the time to create and publish content constantly? This is where scheduling LinkedIn posts becomes a game-changer.
Here’s how scheduling your posts can save you valuable time and keep you engaged on LinkedIn:
-
Save Time Without Stress
Instead of scrambling to post every day, you can plan and schedule your content ahead of time. Set it once and let it roll while you focus on everything else.
-
Stay Consistent, Effortlessly
Posting regularly builds trust and keeps your audience engaged. Scheduling helps you show up even on your busiest days, without having to think twice.
-
Plan Smarter, Not Harder
When you schedule, you get to step back and see the bigger picture. Align your posts with your goals, seasonal trends, or campaigns, and keep your messaging on point.
-
Track What Works
Most scheduling tools come with analytics. That means you can see what’s working, and what’s not, and tweak your timing or content for better results.
Schedule LinkedIn Posts Using SocialBu
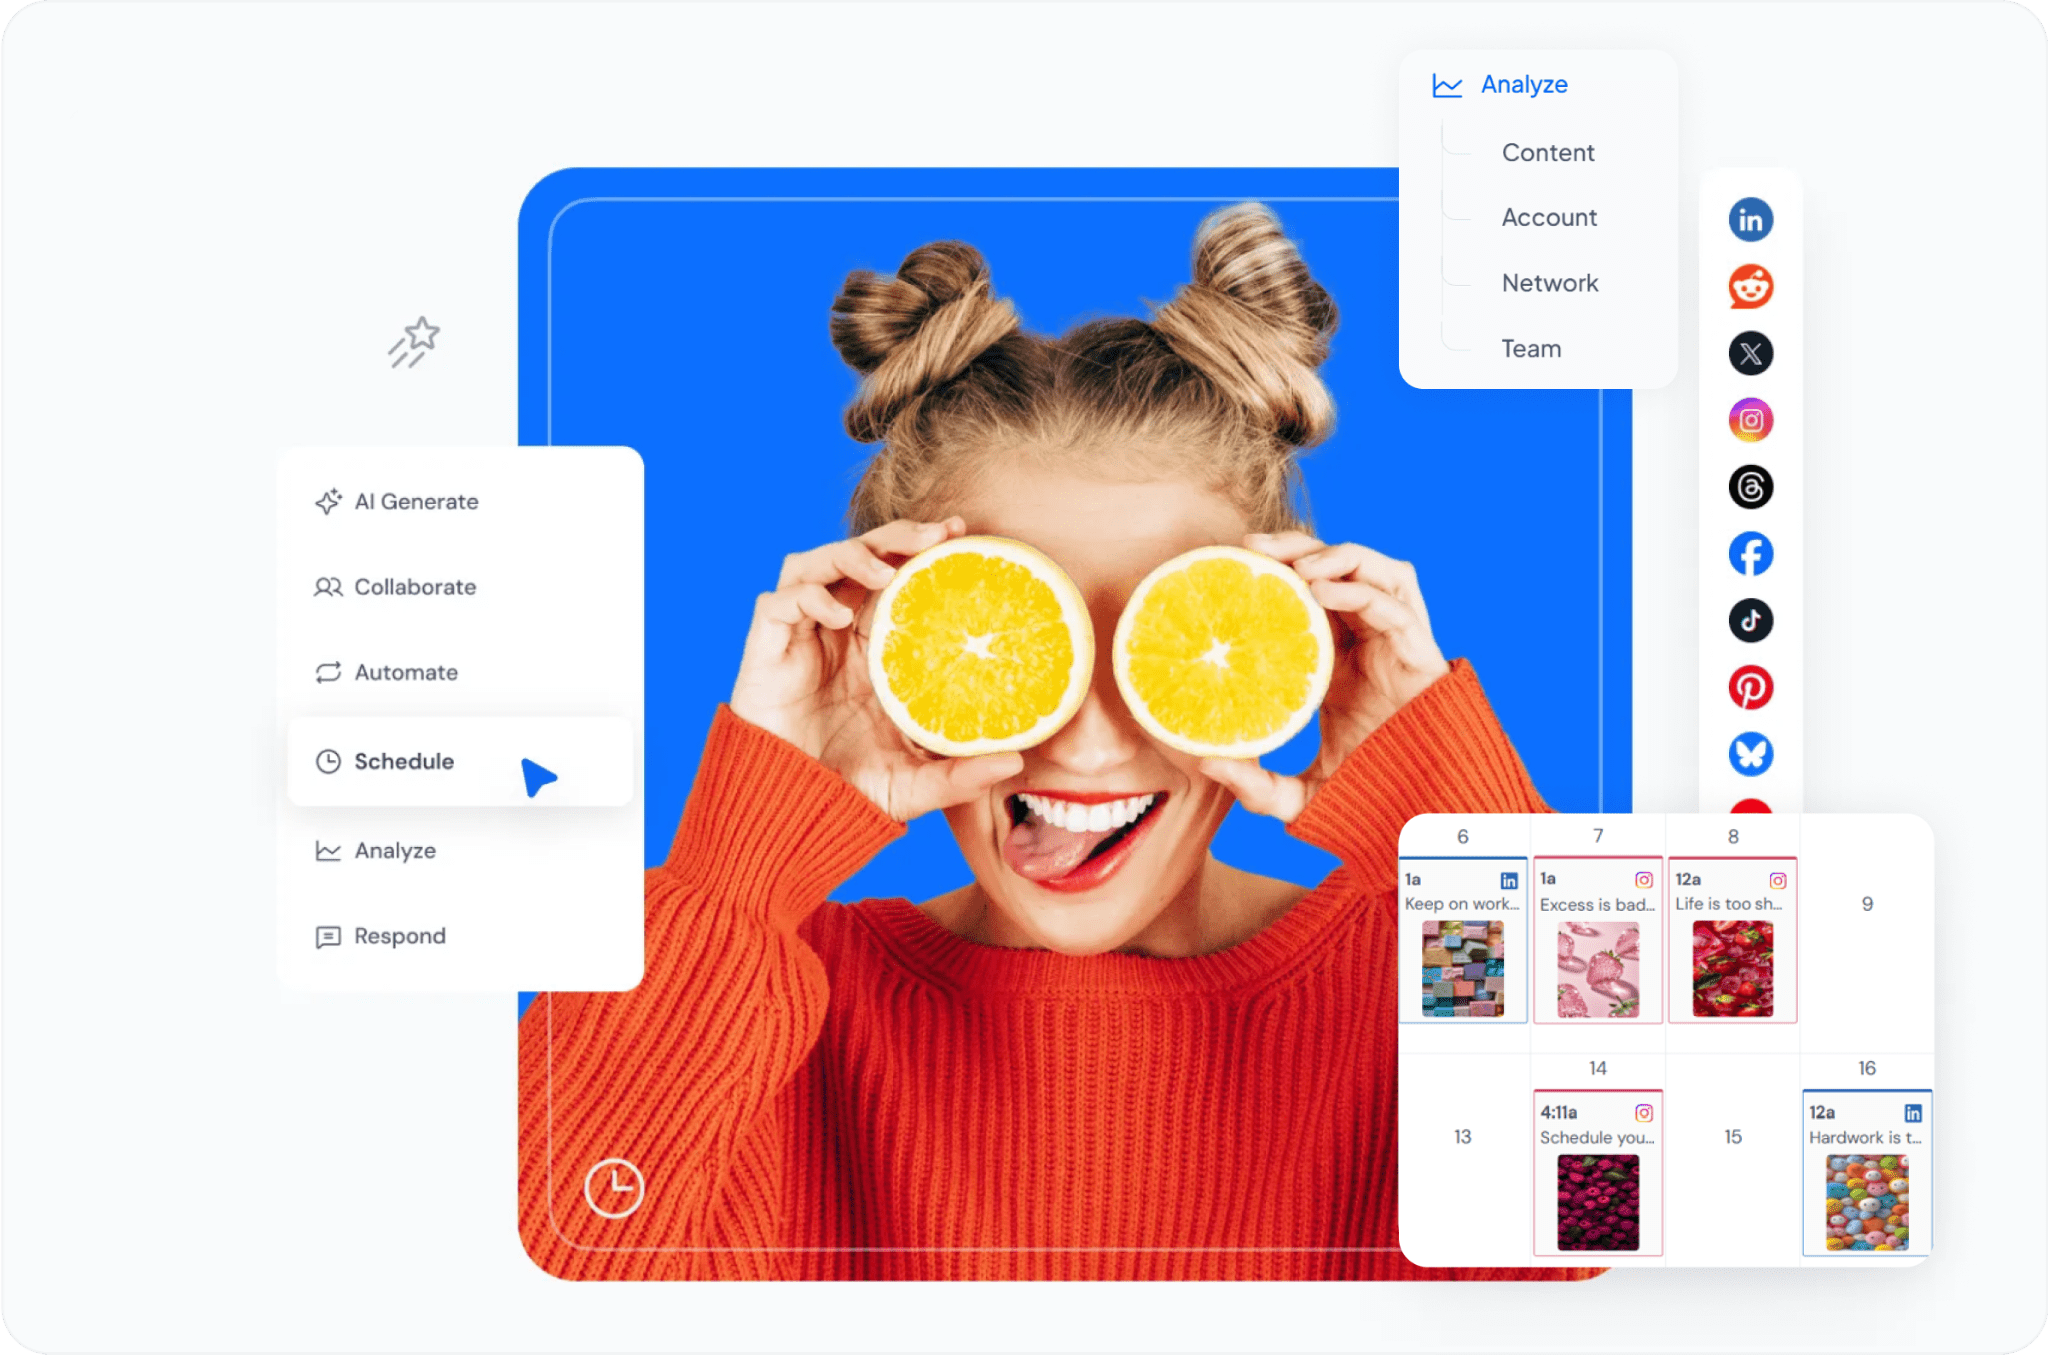
If you need more control over your content, SocialBu is a powerful LinkedIn scheduler that allows you to schedule post on LinkedIn. However, it offers more than just this. Unlike LinkedIn’s basic tool, SocialBu gives you complete scheduling flexibility, advanced analytics, and compliance with LinkedIn’s API policies, so your account stays safe.
Let’s explore how to schedule LinkedIn posts with SocialBu in a few easy steps:
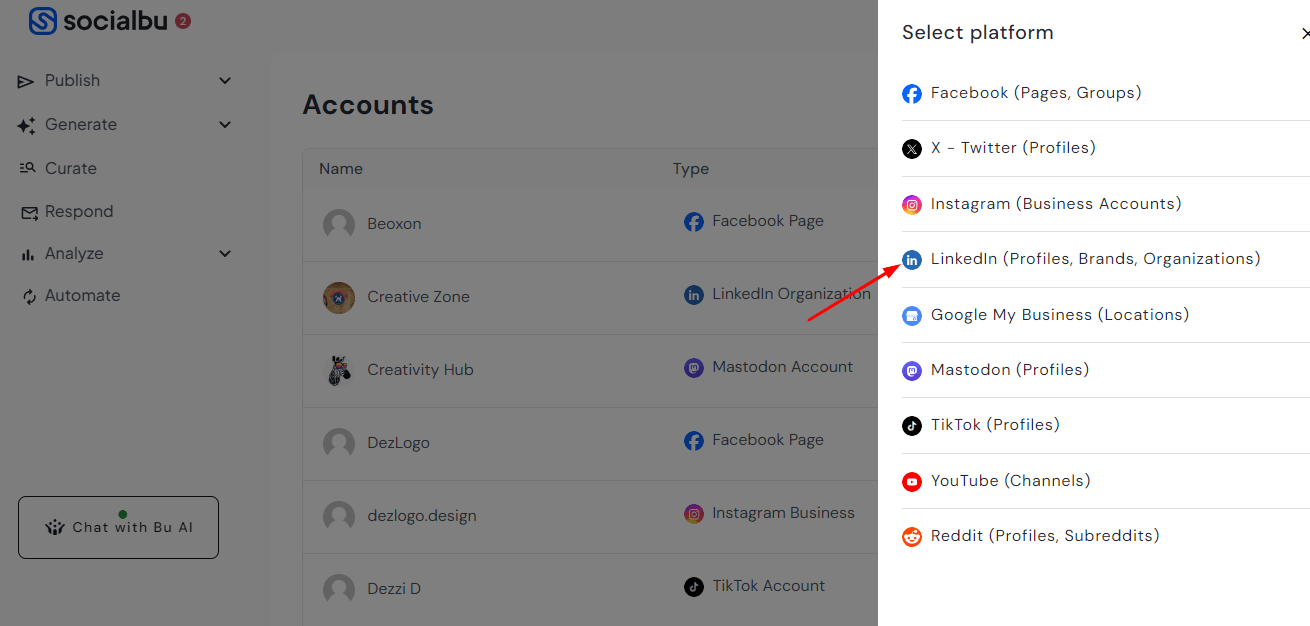
1. Connect Your LinkedIn Account
You can begin by signing up for a free SocialBu account. Once registered, you can connect your LinkedIn profile or business page with SocialBu.
2. Create Your Post
To schedule a LinkedIn post using SocialBu, select the “New Post” button at the top.

Now, select your LinkedIn account icon, and craft your LinkedIn content. You can add text, images, and even videos. SocialBu allows you to schedule various post formats, unlike LinkedIn’s native tool.
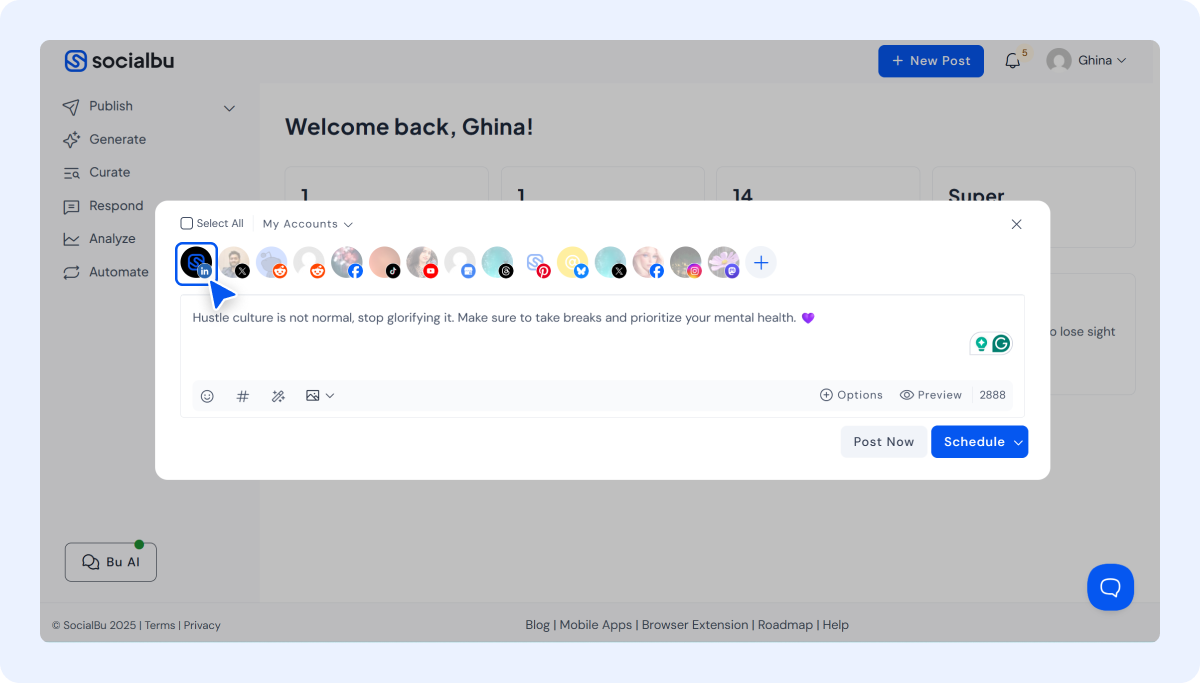
3. Schedule Your Post
Once you are done composing your post, hit the “Schedule” option. If you want your LinkedIn post to go live right away, you can click the “Post Now” option too.
Choose your preferred date and time and hit “Schedule.” Your post will go live at the selected time.

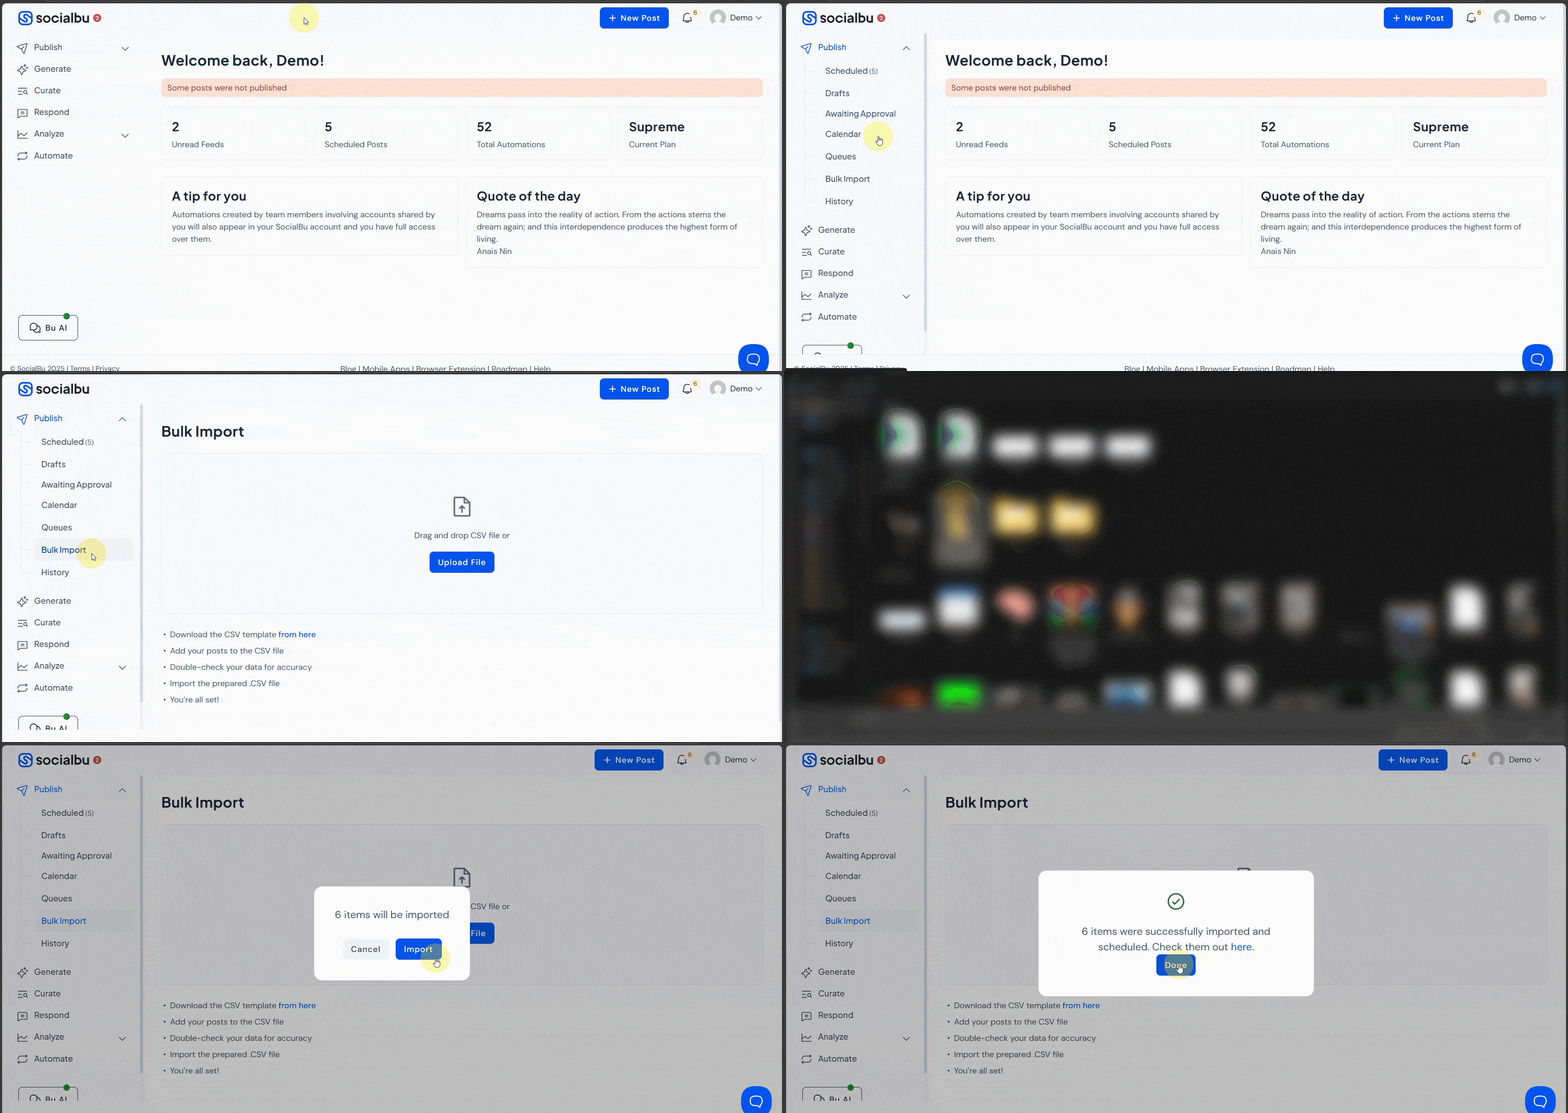
4. Bulk LinkedIn Scheduling
If you want to schedule multiple posts at once, you can bulk-schedule them too. For this, you simply have to upload and schedule multiple posts at once using CSV import or repeat-post templates. You can even remove some scheduled posts on LinkedIn if not needed later.
6. Analyze & Optimize
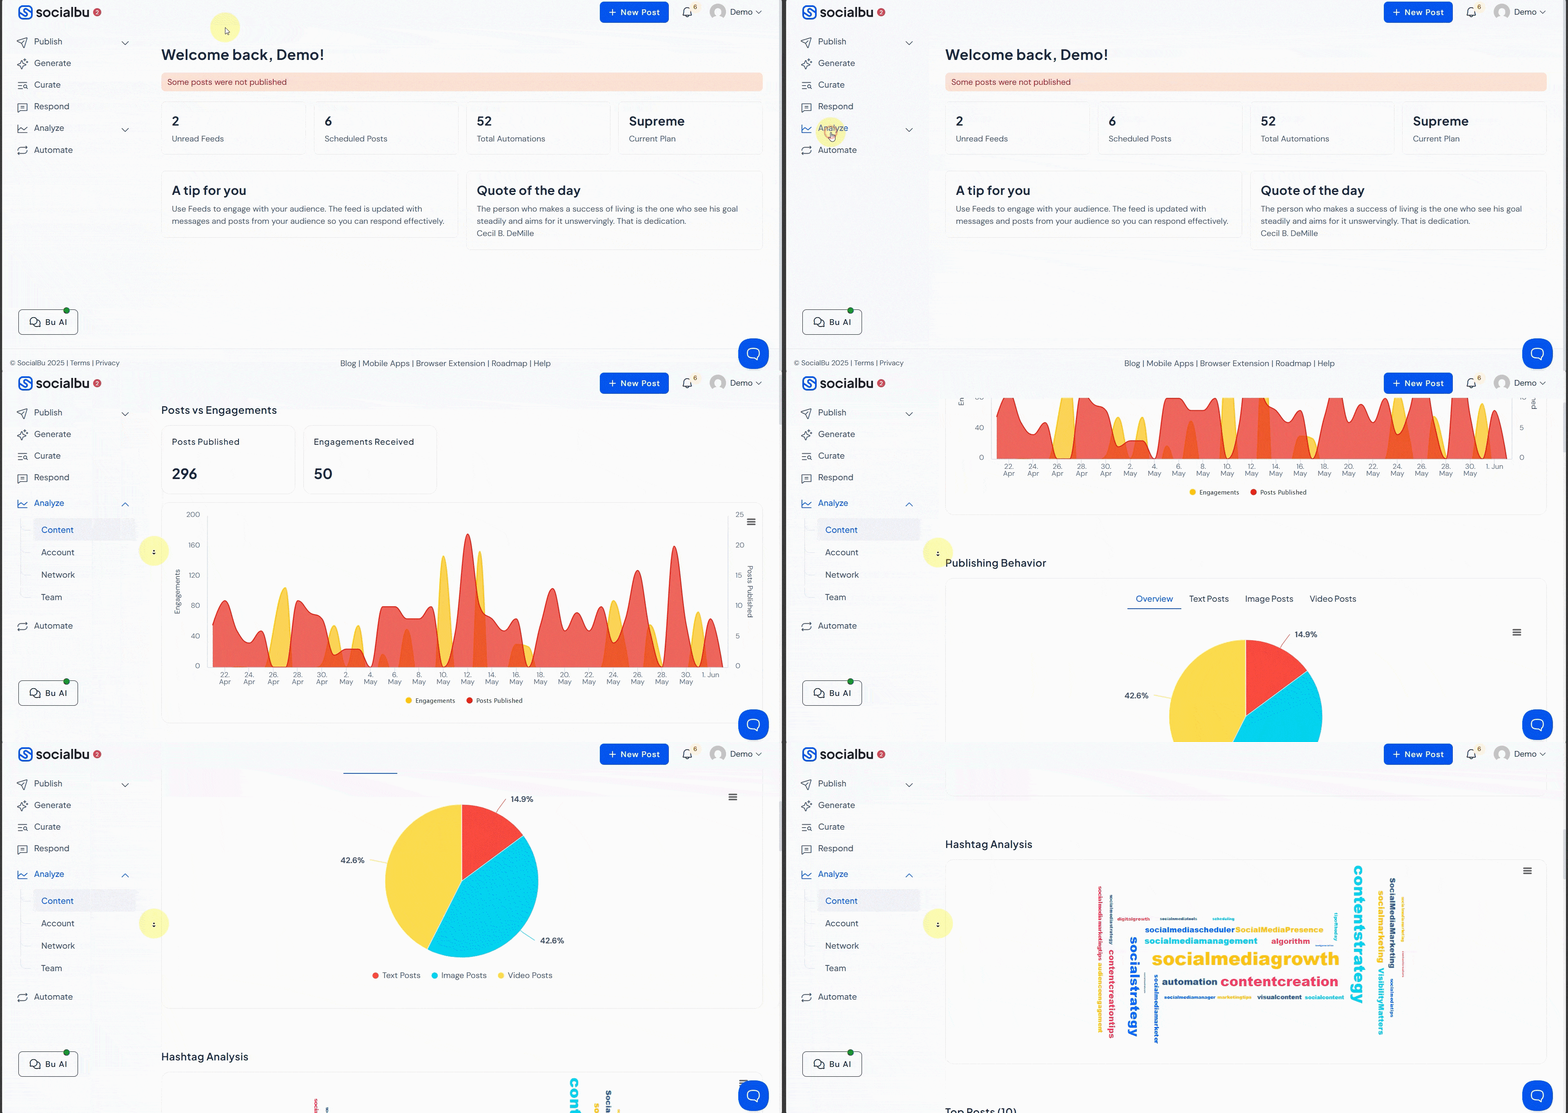
Track engagement, reach, and clicks on your LinkedIn scheduled posts with built-in LinkedIn analytics. See what works, then tweak your strategy.
Why Choose SocialBu for LinkedIn Post Scheduling?
LinkedIn does let you schedule posts natively now, but let’s be honest, it’s basic. You can’t bulk schedule, there’s no central calendar, and you can’t even manage multiple accounts from one place. That’s where SocialBu steps in — a smarter, faster, and way more efficient LinkedIn scheduling tool.
With SocialBu, you can:
-
Schedule Months of Content — All at Once
Forget logging in every day. With SocialBu, you can schedule LinkedIn posts weeks or even months in advance for multiple profiles, saving you hours every week.
-
Bulk Schedule Like a Pro
Unlike LinkedIn’s native option, SocialBu lets you bulk schedule LinkedIn posts using a CSV file or reusable templates, perfect if you’ve got tons of content or work with clients.
-
Get Real Performance Insights
Want to know which posts are working? With SocialBu, you can easily view scheduled posts on LinkedIn along with detailed analytics. See what your audience loves and fine-tune your strategy with confidence.
-
Stay Safe and Compliant
No risky workarounds here; SocialBu is fully compliant with the LinkedIn API, which means your account stays secure, and you stay penalty-free.
-
Manage Everything in One Dashboard
SocialBu gives you a clean, centralized space to handle your content for LinkedIn and other platforms, too. No more tab-hopping or juggling multiple tools.
👉 Start your free trial now and get ahead with smarter, automated LinkedIn posting.
What Metrics to Track After Scheduling Posts
So, you’ve used a LinkedIn scheduling tool to schedule your posts on LinkedIn — great first step! But don’t stop there. Scheduling is just the beginning. To grow on LinkedIn, you need to track how your content performs.
Here are the key social media metrics to keep an eye on:
-
Engagement Rate
Pay attention to likes, comments, and shares. A high engagement rate means your content is resonating. Whether you schedule a LinkedIn post once a week or daily, this helps you spot what’s working.
-
Reach & Impressions
Want to know how many people saw your scheduled LinkedIn posts? These numbers give you insight into visibility, perfect for testing the best LinkedIn post-scheduling times.
-
Click-Throughs
If you’re sharing links, events, or promotions, see how many people clicked. This tells you how effective your call-to-action is.
-
Content Type Performance
Is your audience into text posts, carousels, or videos (even if LinkedIn’s native tool doesn’t support them)? Use this data to plan smarter when you schedule posts on LinkedIn next time.
-
Audience Growth
Watch your followers and profile views. It’s a great way to gauge whether your scheduled content is helping you grow.
Best Practices for Scheduling LinkedIn Posts
Want to get the most out of your scheduled LinkedIn posts? It’s not just about hitting “schedule,” it’s about doing it smartly. Whether you’re using LinkedIn’s built-in option or a more advanced LinkedIn scheduling tool like SocialBu, these tips will help your posts perform better:
-
Be Consistent, Not Overwhelming
Posting 2–3 times a week is the sweet spot. It keeps you visible without overwhelming your audience. The key is to schedule LinkedIn posts regularly so your brand stays top of mind.
-
Post at the Right Times
Timing matters! You need to keep the best time to post on LinkedIn in mind. Use your LinkedIn post scheduler to target these peak windows.
-
Use a Scheduler With Analytics
Don’t just schedule and forget. Choose a tool (like SocialBu!) that not only lets you schedule posts on LinkedIn but also shows performance data. This way, you can fine-tune your content and timing based on real results.
-
Focus on Value
Make sure your scheduled posts are useful, whether they’re educational, inspirational, or just plain entertaining. Great content builds trust and drives engagement.
-
Mix It Up
Don’t stick to just one format. Rotate between text posts, images, links, and (if your LinkedIn scheduler supports it) carousels. Variety keeps things interesting.
Conclusion
Staying consistent on LinkedIn doesn’t have to feel like a full-time job. With the right approach and the right LinkedIn scheduling tool, you can save time, show up regularly, and grow your presence without the daily hustle.
While LinkedIn’s native post scheduler is a decent start, tools like SocialBu give you everything you need to go from “just posting” to posting with purpose. From bulk scheduling LinkedIn posts to real-time analytics and managing everything in one place, it’s all about working smarter, not harder.
So if you’re ready to simplify your workflow, schedule LinkedIn posts for free, and get better results, give SocialBu a try today!
FAQs
Q: Can you schedule posts on LinkedIn?
Yes. LinkedIn has a built-in scheduler for personal and business accounts that allows you to schedule posts. For additional features, consider using third-party tools like SocialBu.
Q: Is there a free LinkedIn scheduler?
Yes. LinkedIn’s native scheduler is free, but it has limited functionality. SocialBu also offers a free trial with advanced options.
Q: Can you bulk schedule LinkedIn posts?
Not with LinkedIn itself. But yes, bulk LinkedIn scheduling is available with tools like SocialBu.
Q: Does scheduling affect LinkedIn engagement?
No, as long as you post at times when your audience is active and the content is valuable. Utilize tools with LinkedIn analytics to assist you.
Q: How do I find the best time to post on LinkedIn?
Use SocialBu’s analytics or try mornings (8–11 AM) on weekdays. Adjust based on your audience’s behavior.
Are LinkedIn schedulers safe to use?
Only use tools that comply with LinkedIn API standards, such as SocialBu, to keep your account secure.
